
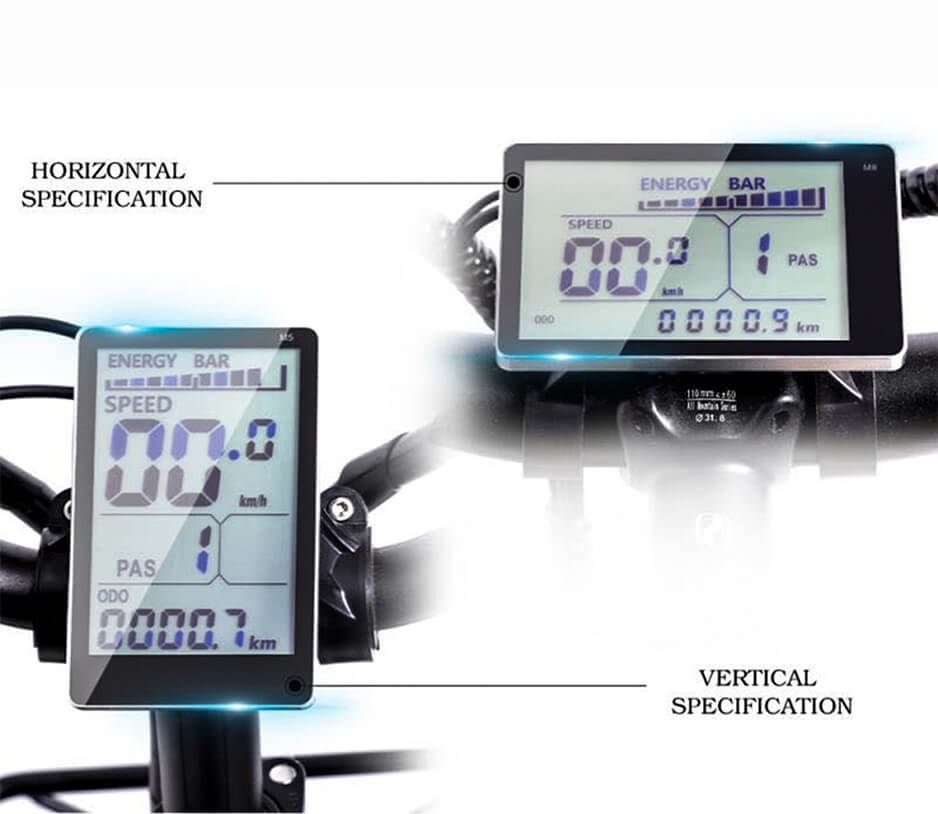
LCD BUTTON OPERATION PROGRAMMING MODE:
1. Press the POWER Button for a long time to save the current values.
2. Press the POWER Button for a short time to switch to the next parameters and save changed
values of the previous parameters
3. Press the UP/DOWN Button to change values.
4. Press both UP/DOWN Buttons to Exit Settings and save the parameters or values.
BUTTON OPERATION NORMAL MODE:
-Short Press Up/Down button while Riding: Changing PAS Level
-Short Press Power ON/OFF (MODE) button while riding: Switch Display Data
-Long Press Down Key in Static State at 0km/h: Entering 6km/h Cruise Mode (Brake or Short
Press to Exit)
-Long Press Up Key in Static State or while driving: Turn On/Off Headlights
| Parameter | Factory Settings | CMACEWHEEL ELECTRIC BIKES LCD M-8 Parameter Programming Description Password Code 101 (UP KEY + POWER BUTTON IN STATIC STATE = KEY ON – DISPLAY ON) |
| P01 | 0002 | BACKLIGHT BRIGHTNESS: 1=DARK; 2=MID 3=HIGH |
| P02 | 0000 | MILEAGE UNIT: 0=KM; 1=MLS |
| P03 | 0048 | SYSTEM VOLTAGE (24V, 36V, 48V) |
| P04 | 0010 | DISPLAY SLEEP TIME: 0=NO DORMANCY; SLEEP TIME= 1-60 MIN |
| P05 | 05 | PEDAL ASSYST (PAS) LEVELS: 0-3, 1-3, 0-5, 1-5 |
| P06 | 22.0-Gw20/Y20 27-KS26 | WHEEL DIAMETER UNIT INCH: IN 0.1 STEPS |
| P07 | 0001 | SPEED MEASUREMENT MAGNETIC STEEL: RANGE 1-255 |
| P08 | 0100 | SPEED LIMIT RANGE: 0-100km/h (100 = MAX SPEED) |
| P09 | 0000 | ZERO START SETTINGS: 0=ZERO START; 1=NON ZERO START |
| P10 | 0002 | DRIVE MODE SETTINGS (THROTTLE): 0=POWER ASSISTED MODE (NO THROTTLE); 1=THROTTLE ONLY (NO PAS); 2=PAS + THROTTLE |
| P11 | 0001 | PAS SENSITIVITY RANGE: 1-24 |
| P12 | 0003 | START PAS INTENSITY RANGE: 0-5 |
| P13 | 0012 | POWER BOOSTER MAGNETIC STEEL DISK TYPE: 5, 8, 12 |
| P14 | 0013 | CONTROLLER CURRENT LIMIT (AMPS): 1-20A |
| P15 | 390 | MIN CONTROLLER UNDERVOLTAGE SHUTOFF (VOLTS) |
| P16 | 0000 | CRUISE ON/OFF SETTINGS: 0=ENABLED; 1=DISABLED |
| P17 | 0000 | ODO ZERO SETTINGS: PRESS UP KEY >5sec = ODO RESET |
Troubleshooting table for instrument manual control panel faults
When a fault occurs, the instrument will prompt the user with code and graphics:
| fault code (decimal) | fault state | Check the location |
| E02 | brake | Check the brake lever for short circuit, no return or damage |
| E06 | battery undervoltage | charge the battery |
| E07 | Motor failure | Motor Hall fault, check whether the Hall wire is short, and whether the plug is plugged in properly. If all is good replace the motor. |
| E08 | Handlebar failure | Check the line and plug of the handlebar, if all are good, replace the handlebar. |
| E09 | Controller failure | The controller is damaged Replace the controller. |
| E10 | Communication reception failure | examine 1. Is there any disconnection in the instrument line? 2. Whether the connection between the controller and the instrument plug is in good condition. 3. Unplug the booster sensor to see if it reports. If it does not report, the sensor is short-circuited and damaged, and the sensor needs to be replaced. 4. Unplug the switch to see if it is reported. If it is not reported, the handlebar is short-circuited and damaged, and the handlebar needs to be replaced. 5. Unplug the motor Hall wire and see if it reports. If it is not reported, the motor Hall is short-circuited and damaged, and the motor needs to be replaced. 6. None of the above can solve the problem, use the replacement method to troubleshoot the fault, and replace the controller or instrument to troubleshoot which problem is. |
| E16 | Electric lock short circuit | Check the electric lock all the way, such as headlights, speakers, USB or other external devices for short circuit. Check the short-circuit point of the external equipment, check if one is turned off and turn it on after 1 minute to see if E16 is still reported. 1. If it is not reported, it is caused by the short circuit of the device you unplugged. 2. If the report continues to check the next short-circuit point, shut down and wait for one minute to start up, and so on. (Note: To check one place, you must shut down and wait for a minute before turning it on again). |
Troubleshooting table for instrument manual control panel faults When a fault occurs, the instrument will prompt the user with code and graphics
| fault code (decimal) | fault state | Check the location |
| E02 | brake | Check the brake lever for short circuit, no return or damage |
| E06 | battery undervoltage | charge the battery |
| E07 | Motor failure | Motor Hall fault, check whether the Hall wire is short, and whether the plug is plugged in properly. If all is good replace the motor. |
| E08 | Handlebar failure | Check the line and plug of the handlebar, if all are good, replace the handlebar. |
| E09 | Controller failure | The controller is damaged Replace the controller. |
| E10 | Communication reception failure | examine 1. Is there any disconnection in the instrument line? 2. Whether the connection between the controller and the instrument plug is in good condition. 3. Unplug the booster sensor to see if it reports. If it does not report, the sensor is short-circuited and damaged, and the sensor needs to be replaced. 4. Unplug the switch to see if it is reported. If it is not reported, the handlebar is short-circuited and damaged, and the handlebar needs to be replaced. 5. Unplug the motor Hall wire and see if it reports. If it is not reported, the motor Hall is short-circuited and damaged, and the motor needs to be replaced. 6. None of the above can solve the problem, use the replacement method to troubleshoot the fault, and replace the controller or instrument to troubleshoot which problem is. |
| E16 | Electric lock short circuit | Check the electric lock all the way, such as headlights, speakers, USB or other external devices for short circuit. Check the short-circuit point of the external equipment, check if one is turned off and turn it on after 1 minute to see if E16 is still reported. 1. If it is not reported, it is caused by the short circuit of the device you unplugged. 2. If the report continues to check the next short-circuit point, shut down and wait for one minute to start up, and so on. (Note: To check one place, you must shut down and wait for a minute before turning it on again). |
E10: Check the Hall wire or replace the Hall wire directly
E16: Set 86 in P07, if it cannot be eliminated, replace the controller
6 Responses
I am not sure where you’re getting your info, but great topic. I needs to spend some time learning more or understanding more.
Thanks for wonderful information I was looking for this info for my mission.
in replacing my M5 the new hook-up came with two plugs the 5 wire and a two wire (black and white wires0 I have no plug for the two wire, where do you plug it in or do we leave it alone, no plug in???
Can I unlock the speed controller
yes, for setting by display. what’s your display model ?
Ich habe Fehlermeldung 09. Kontroller ersetzten. Was ist der Kontroller? Danke
hi friend, check below link:
https://cmacewheel.com/product/48v-36v-controller-for-electric-bike-cmacewheel-20a-18a-ebike/